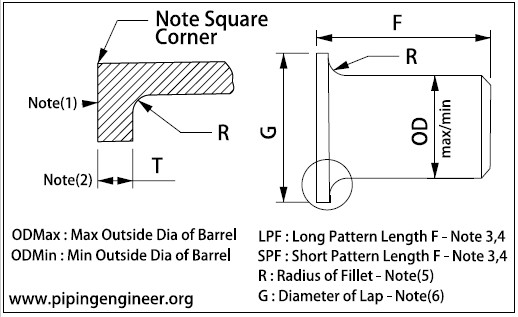
| NPS | ODMax | ODMin | LPF | SPF | R | G |
| 1/2 | 22.8 | 20.5 | 76 | 51 | 3 | 35 |
| 3/4 | 28.1 | 25.9 | 76 | 51 | 3 | 43 |
| 1 | 35.0 | 32.6 | 102 | 51 | 3 | 51 |
| 1-1/4 | 43.6 | 41.4 | 102 | 51 | 5 | 64 |
| 11/2 | 49.9 | 47.5 | 102 | 51 | 6 | 73 |
| 2 | 62.4 | 59.5 | 152 | 64 | 8 | 92 |
| 2-1/2 | 75.3 | 72.2 | 152 | 64 | 8 | 105 |
| 3 | 91.3 | 88.1 | 152 | 64 | 10 | 127 |
| 3-1/2 | 104.0 | 100.8 | 152 | 76 | 10 | 140 |
| 4 | 116.7 | 113.5 | 152 | 76 | 11 | 157 |
| 5 | 144.3 | 140.5 | 203 | 76 | 11 | 186 |
| 6 | 171.3 | 167.5 | 203 | 89 | 13 | 216 |
| 8 | 222.1 | 218.3 | 203 | 102 | 13 | 270 |
| 10 | 277.2 | 272.3 | 254 | 127 | 13 | 324 |
| 12 | 328.0 | 323.1 | 254 | 152 | 13 | 381 |
| NPS | ODMax | ODMin | LPF | SPF | R | G |
| 14 | 359.9 | 354.8 | 305 | 152 | 13 | 413 |
| 16 | 411.0 | 405.6 | 305 | 152 | 13 | 470 |
| 18 | 462.0 | 456.0 | 305 | 152 | 13 | 533 |
| 20 | 514.0 | 507.0 | 305 | 152 | 13 | 584 |
| 22 | 565.0 | 558.0 | 305 | 152 | 13 | 641 |
| 24 | 616.0 | 609.0 | 305 | 152 | 13 | 692 |
GENERAL NOTES:
(a) All dimensions are in millimeters.
(b) See Table 13 for tolerances.
(c) Service conditions and joint construction often dictate stub end length requirements. Therefore, the purchaser must specify long or
short pattern fitting when ordering.
NOTES:
(1) Gasket face finish shall be in accordance with ASME B16.5 for raised face flanges.
(2) The lap thickness T shall not be less than nominal pipe wall thickness. See Table 13 for maximum tolerance.
(3) When short pattern stub ends are used with larger flanges in Classes 300 and 600, with most sizes in Classes 900 and higher, and
when long pattern stub ends are used with larger flanges in Classes 1500 and 2500, it may be necessary to increase the length of the
stub ends in order to avoid covering the weld with the flange. Such increases in length shall be a matter of agreement between the
manufacturer and purchaser.
(4) When special facings such as tongue and groove, male and female, etc., are employed, additional lap thickness must be provided and
such additional thickness shall be in addition to (not included in) the basic length F.
(5) These dimensions conform to the radius established for lap joint flanges in ASME B16.5.
(6) This dimension conforms to standard machined facings shown in ASME B16.5. The back face of the lap shall be machined to conform
to the surface on which it seats. Where ring joint facings are to be applied, use dimension K as given in ASME B16.5.
